SpringBoot整合Spring Security(七)
一、OverView
这一小节整理一下前面几节的内容,主要完整的捋一遍 Spring Security 的登录过程。为了有一个 Architecture First 的印象,先将其中关键的类和接口列出,如果看到后面发现有印象,就可以跳到前面来看一下:
主要可以参考一下这张图:
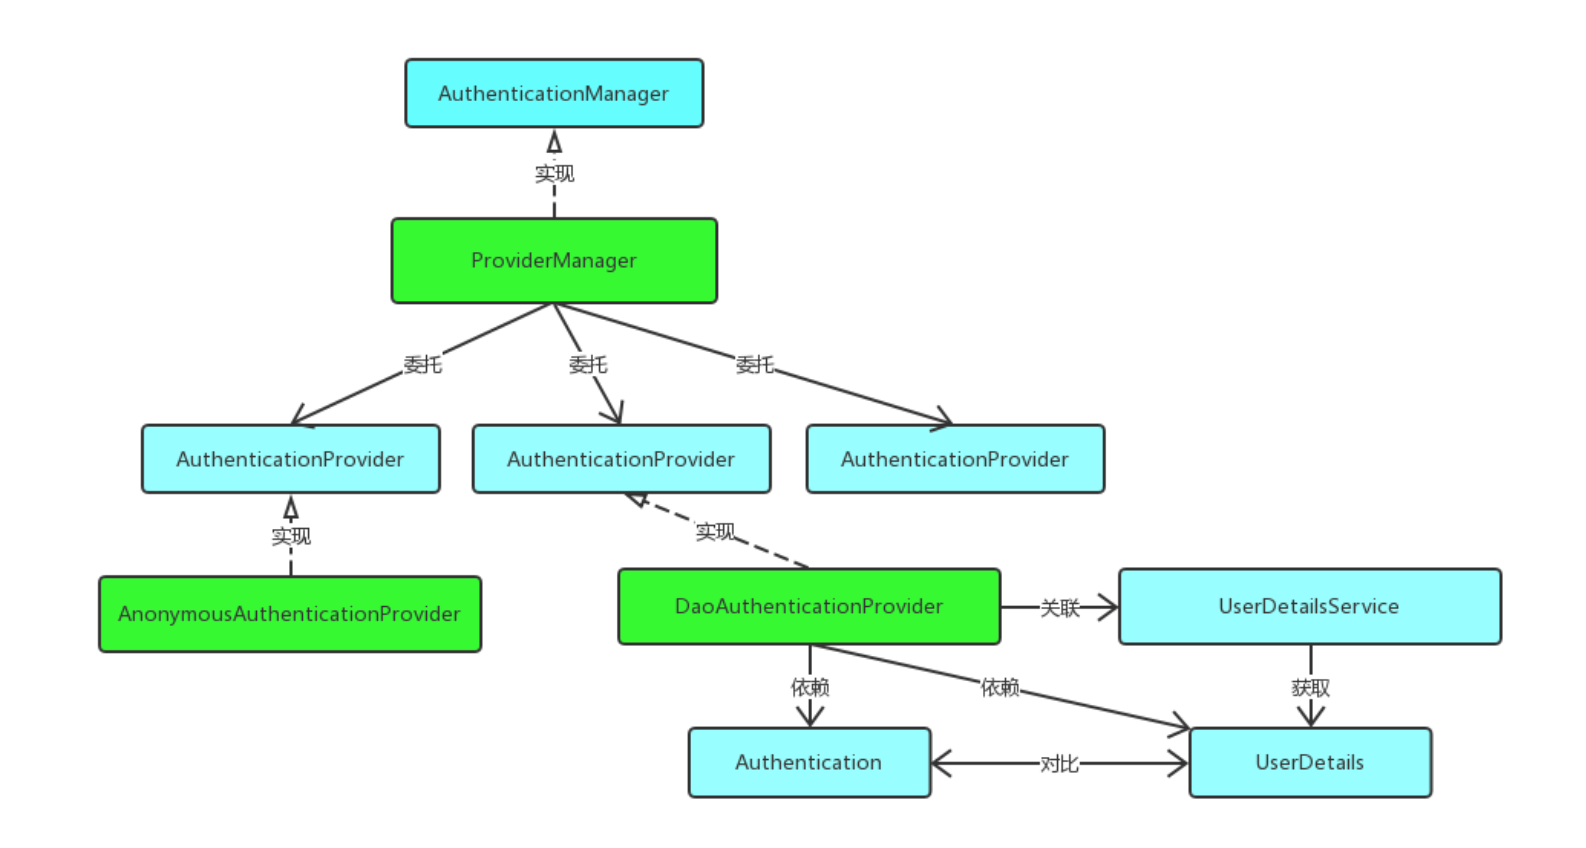
图源:Spring Security(一)–Architecture Overview
二、DeepLearning
2.1 Authentication
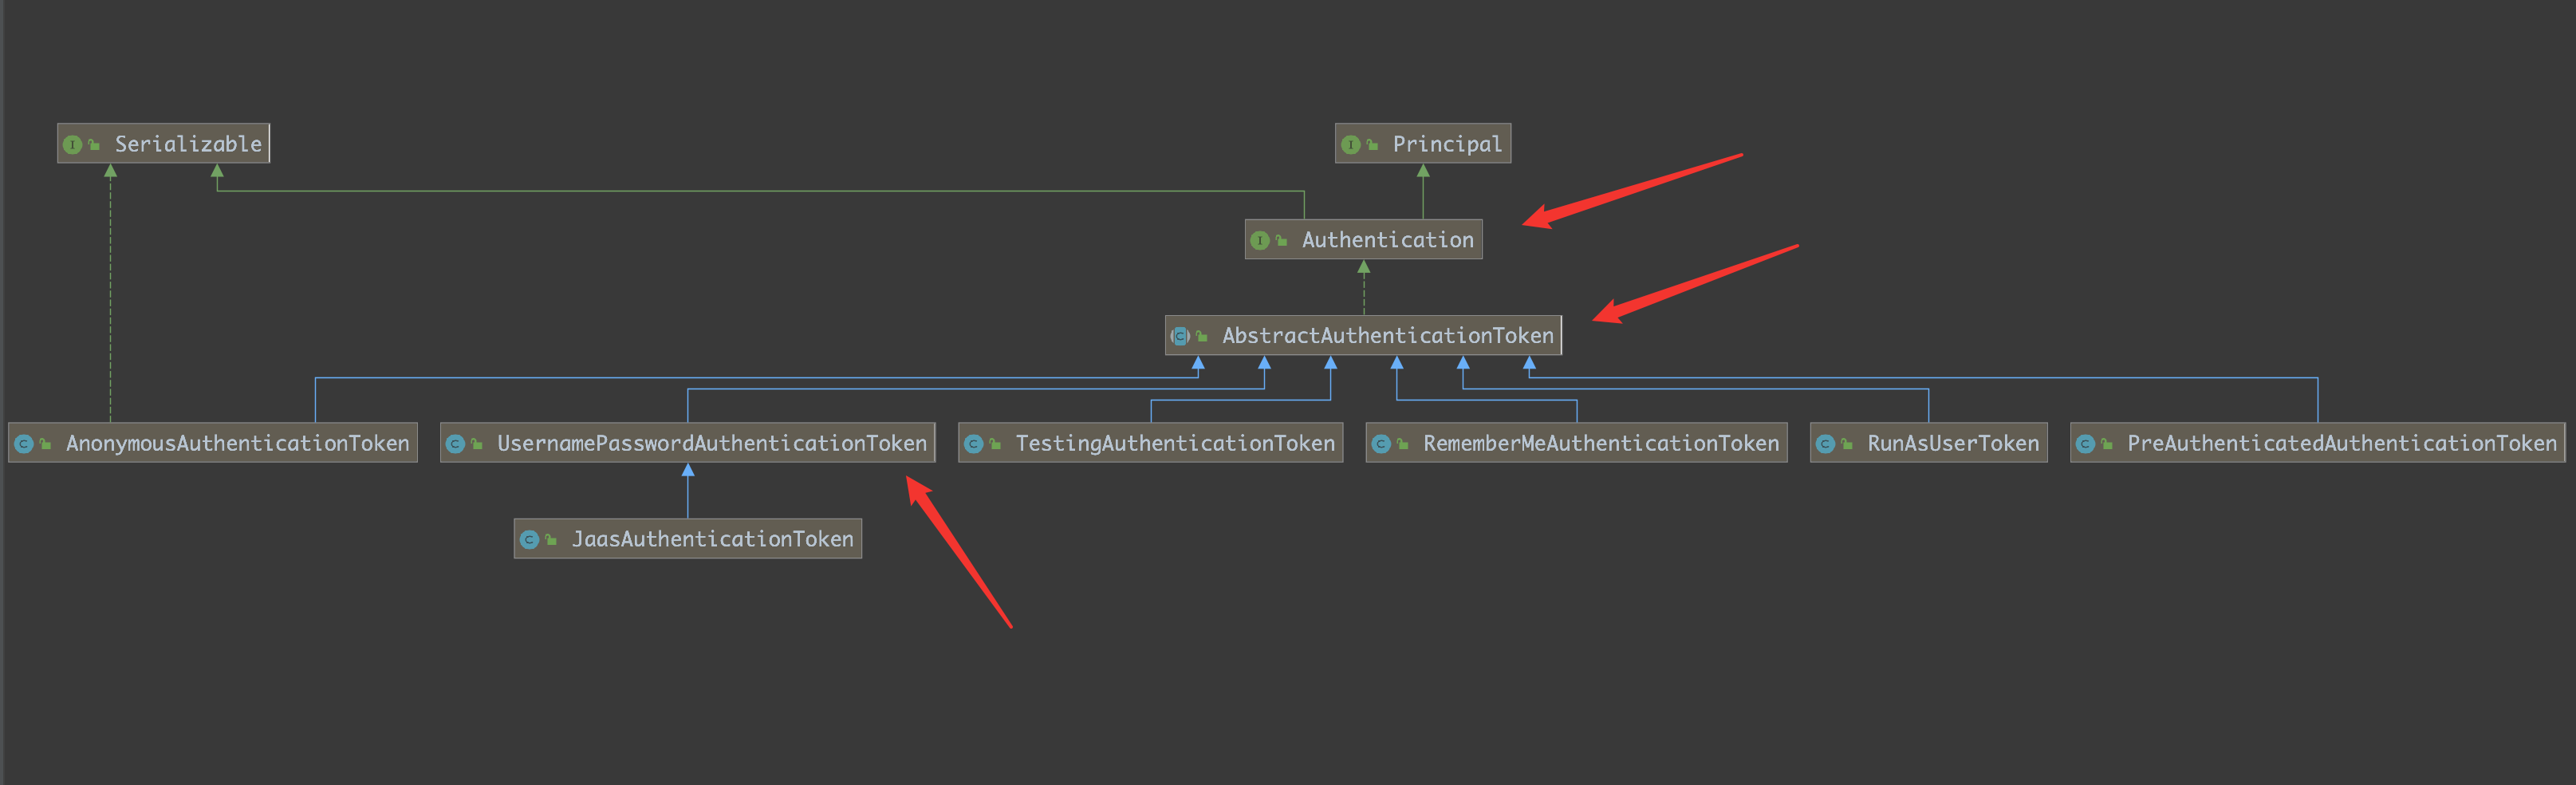
先看一下 Authentication 的相关实现类
源码:
1
2
3
4
5
6
7
8
9
10
11
12
13
| public interface Authentication extends Principal, Serializable {
Collection<? extends GrantedAuthority> getAuthorities();
Object getCredentials();
Object getDetails();
Object getPrincipal();
boolean isAuthenticated();
void setAuthenticated(boolean var1) throws IllegalArgumentException;
}
|
- getAuthorities():权限信息列表,默认是 GrantedAuthority 接口的一些实现类,通常是代表权限信息的一系列字符串。
- getCredentials():密码信息,用户输入的密码字符串,在认证过后通常会被移除,用于保障安全。
- getDetails():细节信息,web 应用中的实现接口通常为 WebAuthenticationDetails,它记录了访问者的 ip 地址和 sessionId 的值。
- getPrincipal():最重要的身份信息,大部分情况下返回的是 UserDetails 接口的实现类,也是框架中的常用接口之一。UserDetails 接口将会在下面的小节重点介绍。
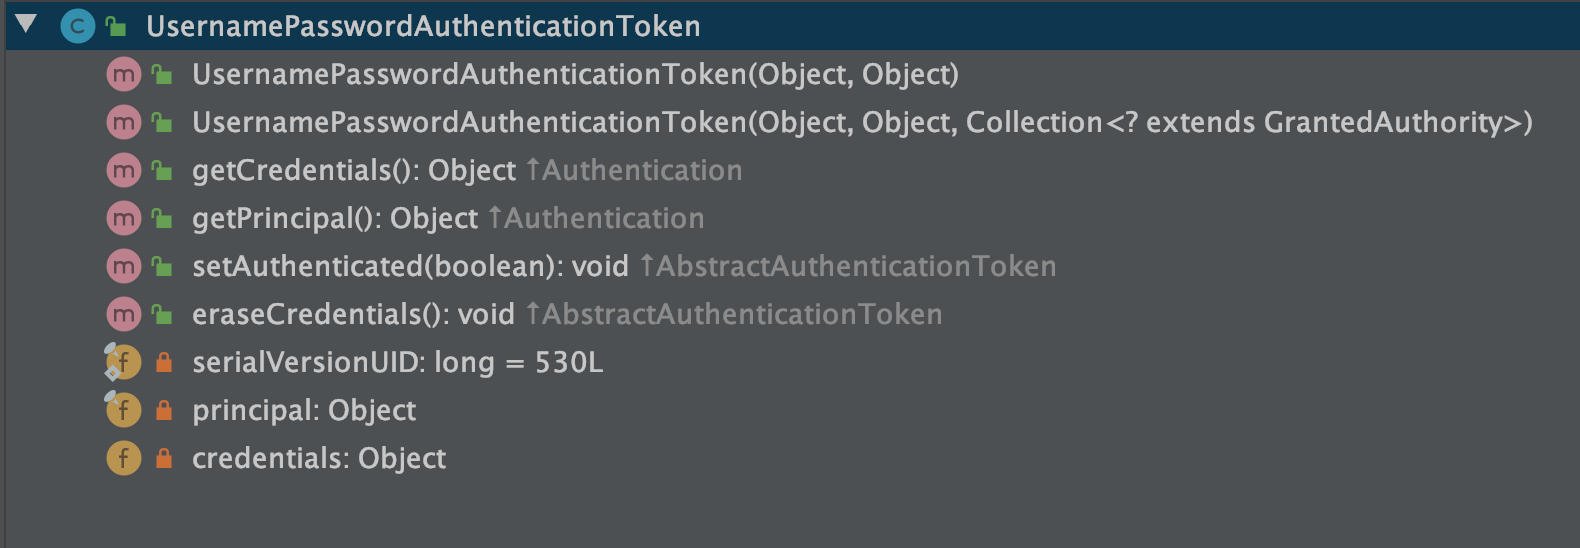
在实现类中非常重要的就是 UsernamePasswordAuthenticationToken ,再看一下其中的属性和方法
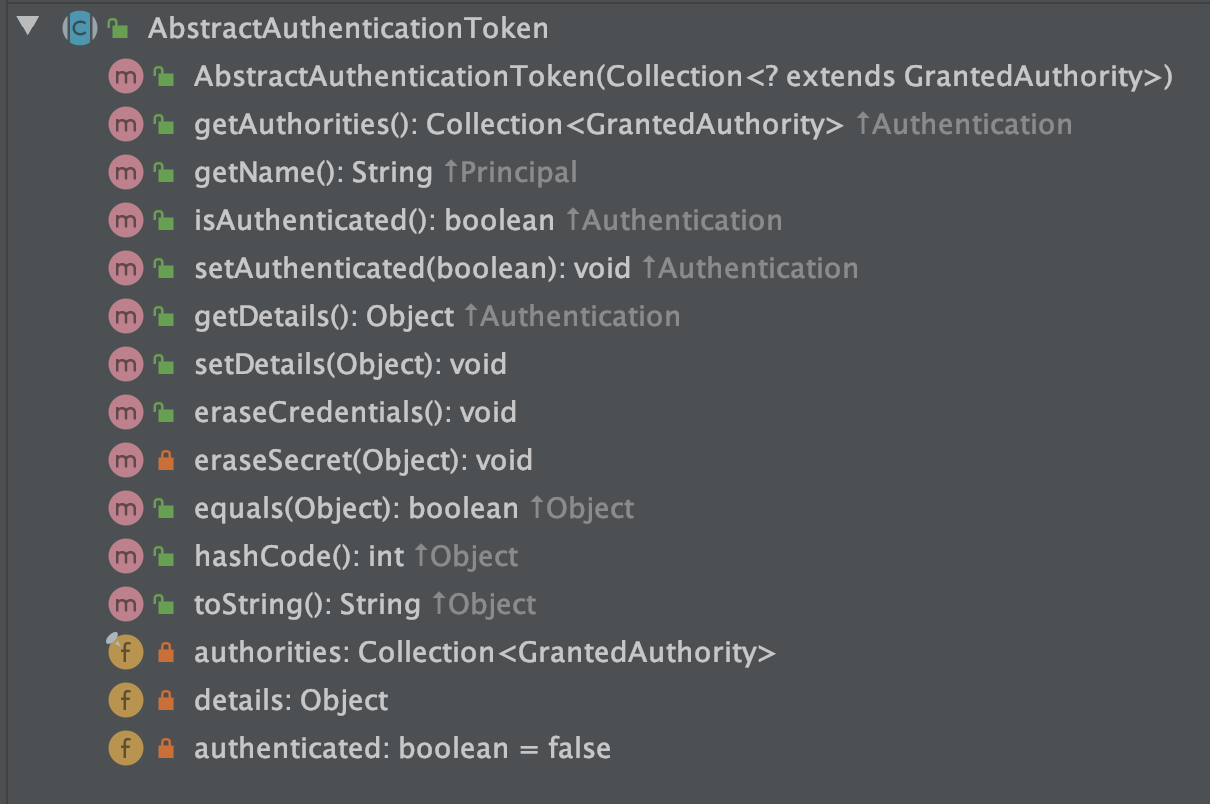
以及它的父类:AbstractAuthenticationToken
2.2 UsernamePasswordAuthenticationFilter
在 Spring Security 中,认证与授权的相关校验都是在一系列的过滤器链中完成的,在这一系列的过滤器链中,和认证相关的过滤器就是 UsernamePasswordAuthenticationFilter:
1
2
3
4
5
6
7
8
9
10
11
12
13
14
15
16
17
18
19
20
21
22
23
24
25
26
27
28
29
30
31
32
33
34
35
36
| public class UsernamePasswordAuthenticationFilter extends AbstractAuthenticationProcessingFilter {
public UsernamePasswordAuthenticationFilter() {
super(new AntPathRequestMatcher("/login", "POST"));
}
public Authentication attemptAuthentication(HttpServletRequest request, HttpServletResponse response) throws AuthenticationException {
if (this.postOnly && !request.getMethod().equals("POST")) {
throw new AuthenticationServiceException("Authentication method not supported: " + request.getMethod());
} else {
String username = this.obtainUsername(request);
String password = this.obtainPassword(request);
if (username == null) {
username = "";
}
if (password == null) {
password = "";
}
username = username.trim();
UsernamePasswordAuthenticationToken authRequest = new UsernamePasswordAuthenticationToken(username, password);
this.setDetails(request, authRequest);
return this.getAuthenticationManager().authenticate(authRequest);
}
}
@Nullable
protected String obtainPassword(HttpServletRequest request) {
return request.getParameter(this.passwordParameter);
}
@Nullable
protected String obtainUsername(HttpServletRequest request) {
return request.getParameter(this.usernameParameter);
}
}
|
其中:UsernamePasswordAuthenticationFilter 是继承 AbstractAuthenticationProcessingFilter
- 通过 obtainUsername 和 obtainPassword 方法提取出请求里边的用户名/密码出来,提取方式就是 request.getParameter
- 获取到请求里传递来的用户名/密码之后,接下来就构造一个 UsernamePasswordAuthenticationToken 对象,传入 username 和 password,username 对应了 UsernamePasswordAuthenticationToken 中的 principal 属性,而 password 则对应了它的 credentials 属性
- 接下来 setDetails 方法给 details 属性赋值,UsernamePasswordAuthenticationToken 本身是没有 details 属性的,这个属性在它的父类 AbstractAuthenticationToken 中。details 是一个对象,这个对象里边放的是 WebAuthenticationDetails 实例,该实例主要描述了两个信息,请求的 remoteAddress 以及请求的 sessionId
- 最后调用 authenticate 方法去做校验了
仔细来细说一下上面代码中的最后一个方法中的校验:authenticate
校验操作首先要获取到一个 AuthenticationManager:

这里拿到的是 ProviderManager ,所以接下来我们就进入到 ProviderManager 的 authenticate 方法中:
1
2
3
4
5
6
7
8
9
10
11
12
13
14
15
16
17
18
19
20
21
22
23
24
25
26
27
28
29
30
31
32
33
34
35
36
37
38
39
40
41
42
43
44
45
46
47
48
49
50
51
52
53
54
55
56
57
58
59
60
61
62
| public Authentication authenticate(Authentication authentication)
throws AuthenticationException {
Class<? extends Authentication> toTest = authentication.getClass();
AuthenticationException lastException = null;
AuthenticationException parentException = null;
Authentication result = null;
Authentication parentResult = null;
boolean debug = logger.isDebugEnabled();
for (AuthenticationProvider provider : getProviders()) {
if (!provider.supports(toTest)) {
continue;
}
if (debug) {
logger.debug("Authentication attempt using "
+ provider.getClass().getName());
}
try {
result = provider.authenticate(authentication);
if (result != null) {
copyDetails(authentication, result);
break;
}
}
catch (AccountStatusException | InternalAuthenticationServiceException e) {
prepareException(e, authentication);
throw e;
} catch (AuthenticationException e) {
lastException = e;
}
}
if (result == null && parent != null) {
try {
result = parentResult = parent.authenticate(authentication);
}
catch (ProviderNotFoundException e) {
}
catch (AuthenticationException e) {
lastException = parentException = e;
}
}
if (result != null) {
if (eraseCredentialsAfterAuthentication
&& (result instanceof CredentialsContainer)) {
((CredentialsContainer) result).eraseCredentials();
}
if (parentResult == null) {
eventPublisher.publishAuthenticationSuccess(result);
}
return result;
}
......
throw lastException;
}
|
- 首先获取 authentication 的 Class,判断当前 provider 是否支持该 authentication
- 如果支持,则调用 provider 的 authenticate 方法开始做校验,校验完成后,会返回一个新的 Authentication
- 这里的 provider 可能有多个,如果 provider 的 authenticate 方法没能正常返回一个 Authentication,则调用 provider 的 parent 的 authenticate 方法继续校验
- copyDetails 方法则用来把旧的 Token 的 details 属性拷贝到新的 Token 中来
- 接下来会调用 eraseCredentials 方法擦除凭证信息,也就是你的密码,这个擦除方法比较简单,就是将 Token 中的 credentials 属性置空
- 最后通过 publishAuthenticationSuccess 方法将登录成功的事件广播出去
在具体说一下调用 provider 的 authenticate 方法的过程:
- 在 for 循环中,第一次拿到的 provider 是一个 AnonymousAuthenticationProvider,这个 provider 压根就不支持 UsernamePasswordAuthenticationToken,也就是会直接在 provider.supports 方法中返回 false,结束 for 循环
- 然后会进入到下一个 if 中,直接调用 parent 的 authenticate 方法进行校验。而 parent 就是 ProviderManager,所以会再次回到这个 authenticate 方法中。再次回到 authenticate 方法中,provider 也变成了 DaoAuthenticationProvider,这个 provider 是支持 UsernamePasswordAuthenticationToken 的
- 所以会顺利进入到该类的 authenticate 方法去执行,而 DaoAuthenticationProvider 继承自 AbstractUserDetailsAuthenticationProvider 并且没有重写 authenticate 方法,所以 我们最终来到 AbstractUserDetailsAuthenticationProvider#authenticate 方法中:
1
2
3
4
5
6
7
8
9
10
11
12
13
14
15
16
17
18
19
20
21
22
23
24
25
26
27
28
29
30
31
32
33
34
35
36
37
38
39
40
41
42
43
44
45
46
47
48
49
50
51
52
53
54
55
56
57
58
59
60
61
62
63
64
65
66
67
68
69
70
71
| public Authentication authenticate(Authentication authentication)
throws AuthenticationException {
Assert.isInstanceOf(UsernamePasswordAuthenticationToken.class, authentication,
() -> messages.getMessage(
"AbstractUserDetailsAuthenticationProvider.onlySupports",
"Only UsernamePasswordAuthenticationToken is supported"));
String username = (authentication.getPrincipal() == null) ? "NONE_PROVIDED"
: authentication.getName();
boolean cacheWasUsed = true;
UserDetails user = this.userCache.getUserFromCache(username);
if (user == null) {
cacheWasUsed = false;
try {
user = retrieveUser(username,
(UsernamePasswordAuthenticationToken) authentication);
}
catch (UsernameNotFoundException notFound) {
logger.debug("User '" + username + "' not found");
if (hideUserNotFoundExceptions) {
throw new BadCredentialsException(messages.getMessage(
"AbstractUserDetailsAuthenticationProvider.badCredentials",
"Bad credentials"));
}
else {
throw notFound;
}
}
Assert.notNull(user,
"retrieveUser returned null - a violation of the interface contract");
}
try {
preAuthenticationChecks.check(user);
additionalAuthenticationChecks(user,
(UsernamePasswordAuthenticationToken) authentication);
}
catch (AuthenticationException exception) {
if (cacheWasUsed) {
cacheWasUsed = false;
user = retrieveUser(username,
(UsernamePasswordAuthenticationToken) authentication);
preAuthenticationChecks.check(user);
additionalAuthenticationChecks(user,
(UsernamePasswordAuthenticationToken) authentication);
}
else {
throw exception;
}
}
postAuthenticationChecks.check(user);
if (!cacheWasUsed) {
this.userCache.putUserInCache(user);
}
Object principalToReturn = user;
if (forcePrincipalAsString) {
principalToReturn = user.getUsername();
}
return createSuccessAuthentication(principalToReturn, authentication, user);
}
|
- 首先从 Authentication 提取出登录用户名
- 然后通过拿着 username 去调用 retrieveUser 方法去获取当前用户对象,这一步会调用我们自己在登录时候的写的 loadUserByUsername 方法,所以这里返回的 user 其实就是你的登录对象
- 接下来调用 preAuthenticationChecks.check 方法去检验 user 中的各个账户状态属性是否正常,例如账户是否被禁用、账户是否被锁定、账户是否过期等等
- additionalAuthenticationChecks 方法则是做密码比对的
- 最后在 postAuthenticationChecks.check 方法中检查密码是否过期
- 接下来有一个 forcePrincipalAsString 属性,这个是是否强制将 Authentication 中的 principal 属性设置为字符串,这个属性我们一开始在 UsernamePasswordAuthenticationFilter 类中其实就是设置为字符串的(即 username),但是默认情况下,当用户登录成功之后, 这个属性的值就变成当前用户这个对象了。之所以会这样,就是因为 forcePrincipalAsString 默认为 false,不过这块其实不用改,就用 false,这样在后期获取当前用户信息的时候反而方便很多
- 最后,通过 createSuccessAuthentication 方法构建一个新的 UsernamePasswordAuthenticationToken
整体流程大概如下:

图源:Spring Security认证过程